Follow Us: Facebook Twitter Google Plus Linkedin Youtube
Home > > Articles by: shawnrao

All posts by shawnrao

Creating a Customer facing Quote in APTTUS X-Author Tool

Apttus provides powerful, flexible tools that you can use to streamline your contract management. The award winning X-Author tool is an add-on to MS Office.  For this blog, we will showcase the use of MS Word on a Windows PC (sorry Mac users!)

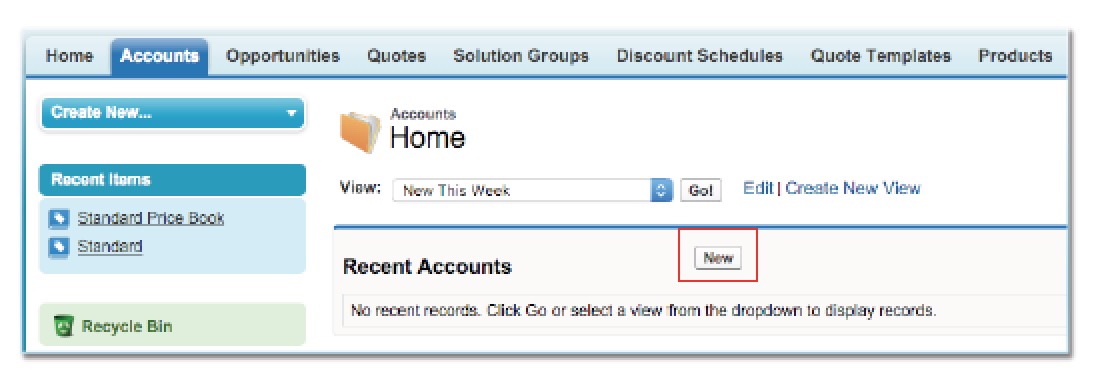
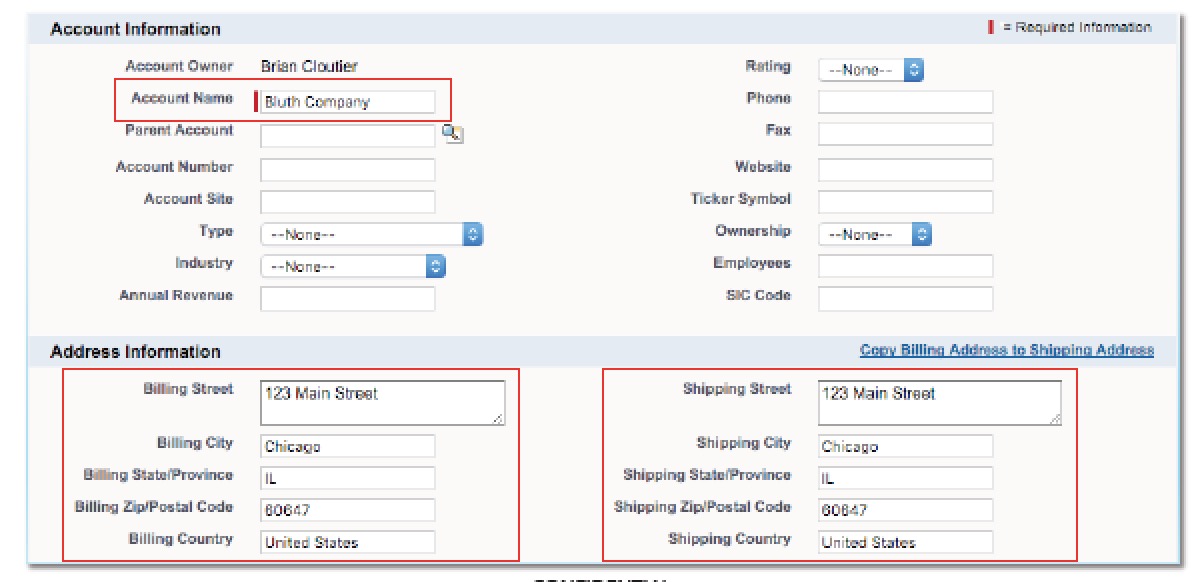
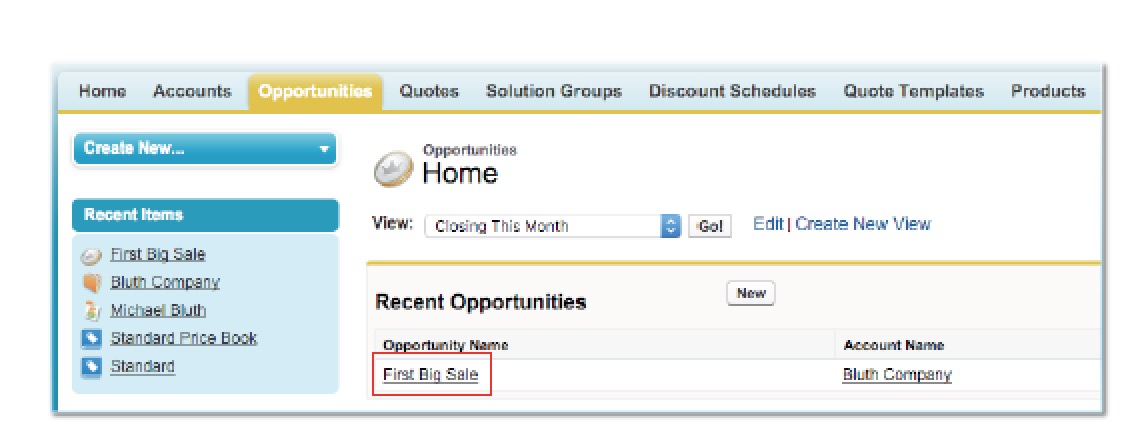
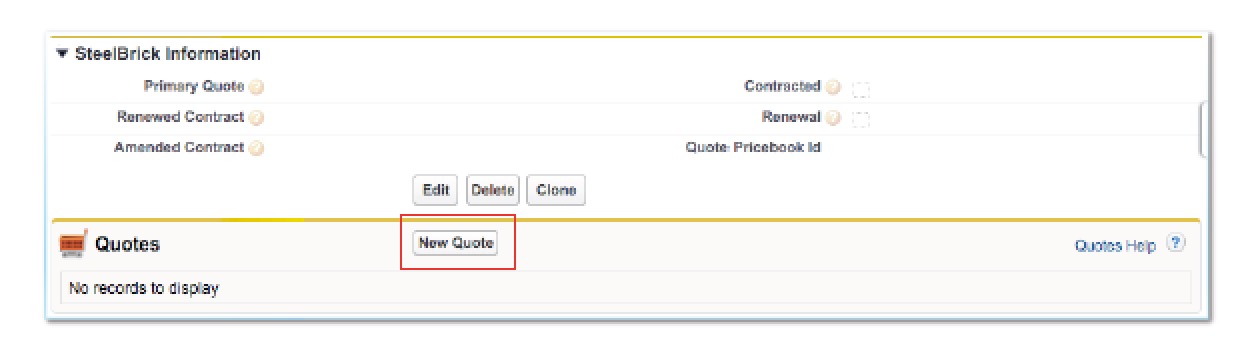
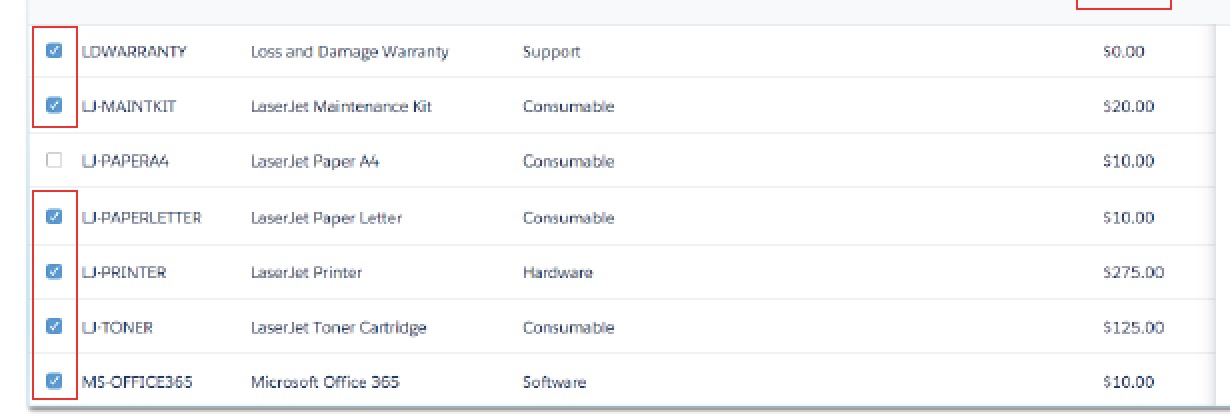
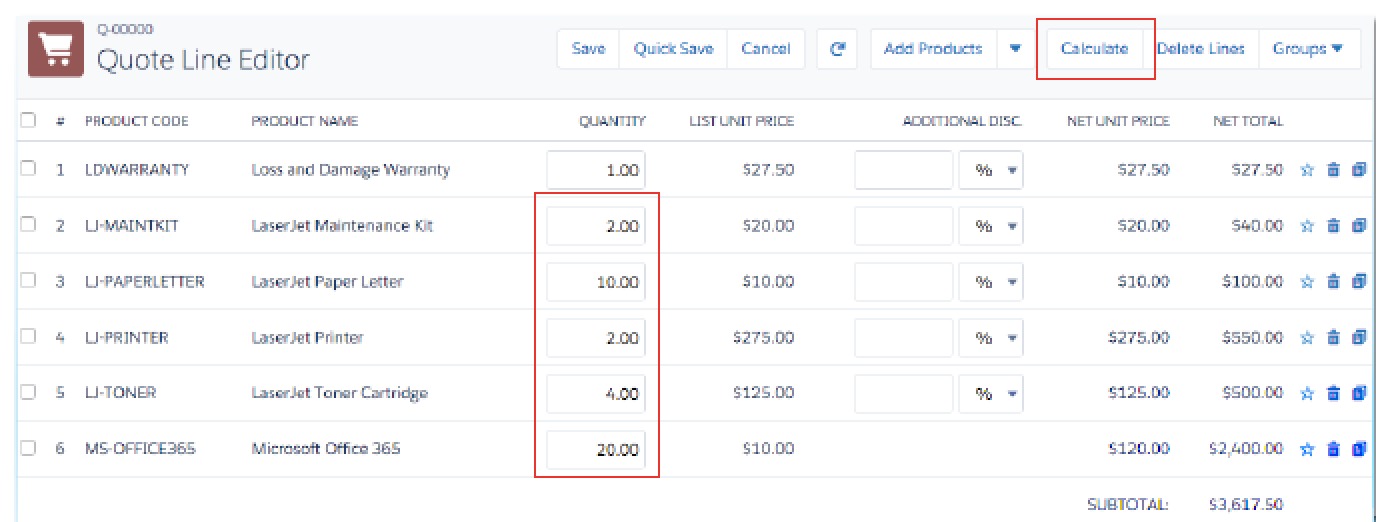
  1. Create a Quote/Proposal and add a few product line items by clicking Configure Products >Configure > Add products> Go to Pricing >Finalize

Creating and Using Templates

Templates are Apttus-specific objects in a Salesforce organization that combine static text, such as contractual language, with data from the Salesforce database in order to generate a final document that will be presented to a customer. The merging of data into the template structure is accomplished through the following Apttus technology:

  • Fields: These fields denote a specific database field that should be brought into the document at the location of the merge field’s inclusion. They can be interspersed with static text in the template so that the final document reads as naturally as a document that was created manually.
  • Lookup Fields: These merge fields rely on a connection between related objects in the database in order to bring in data to the template. In relational database terms, it is akin to performing a table join.
  • Clauses: Modular blocks of text that are used repeatedly. By adding these blocks to a library called a playbook, they can be reused continuously in multiple documents.

Creating a template requires Apttus-specific functionality that is included in the X-Author plugin for Microsoft Word. When connecting via the X-Author plugin, make sure that you are using the correct credentials.

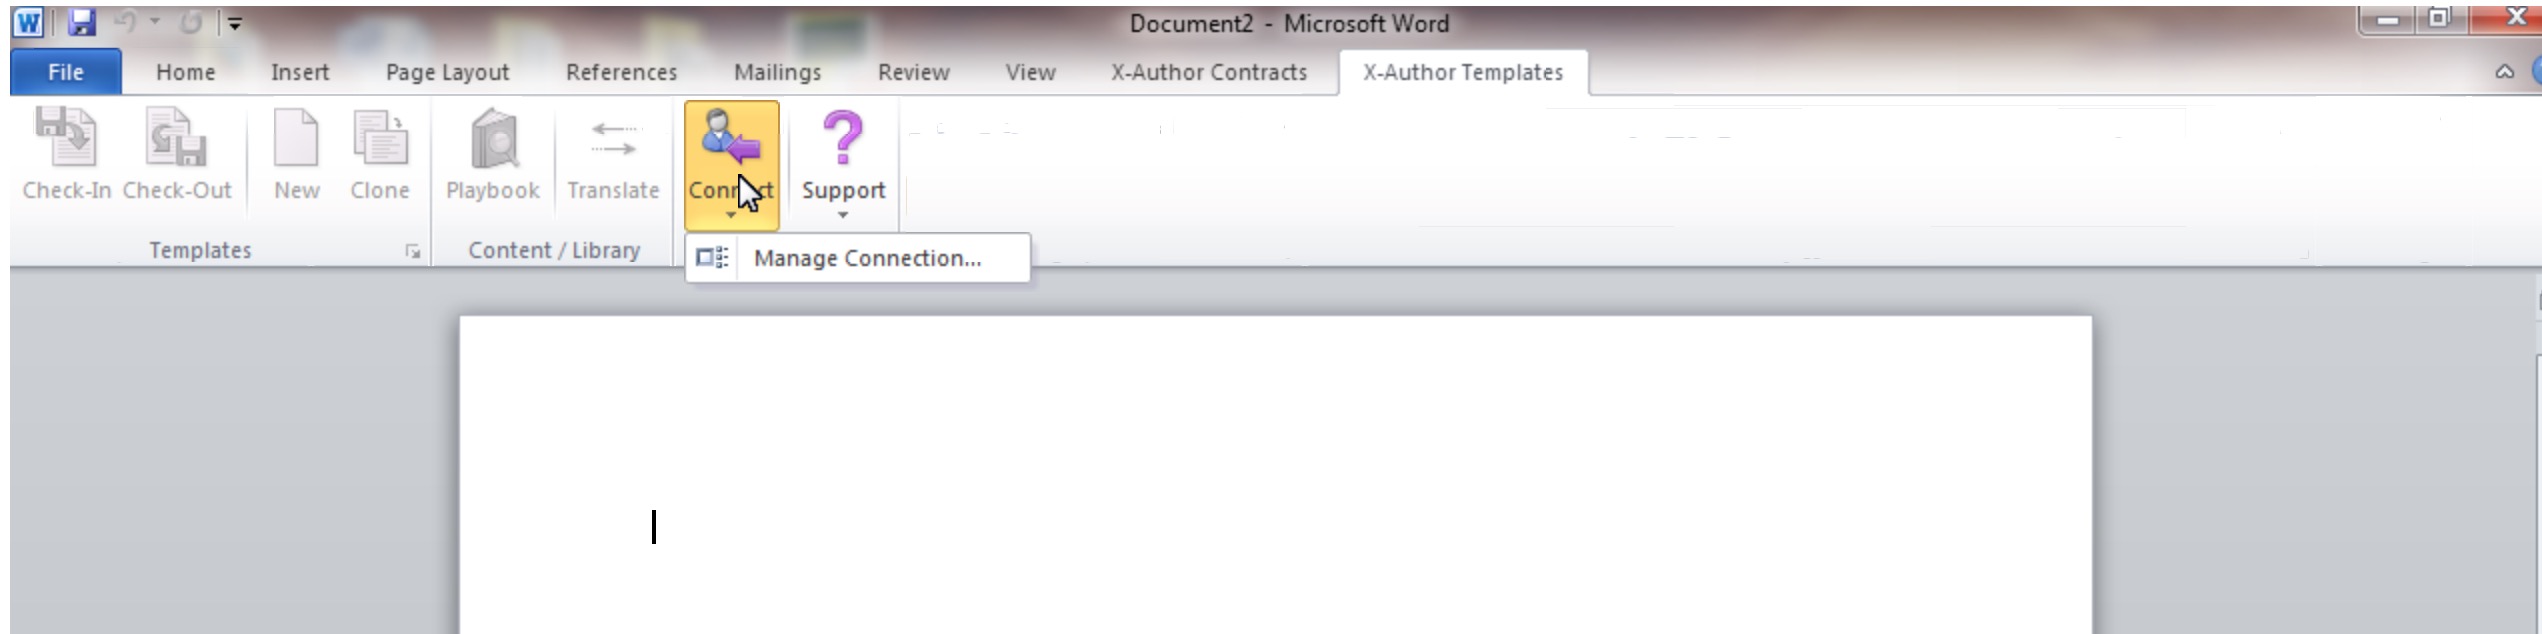
The screenshot below shows the X-Author Templates tab in MS Word.  Please note that is defaults to the X-Author Contracts tab and that will NOT work for Quotes.  You will need to click on –Author Templates tab to come to the correct area.

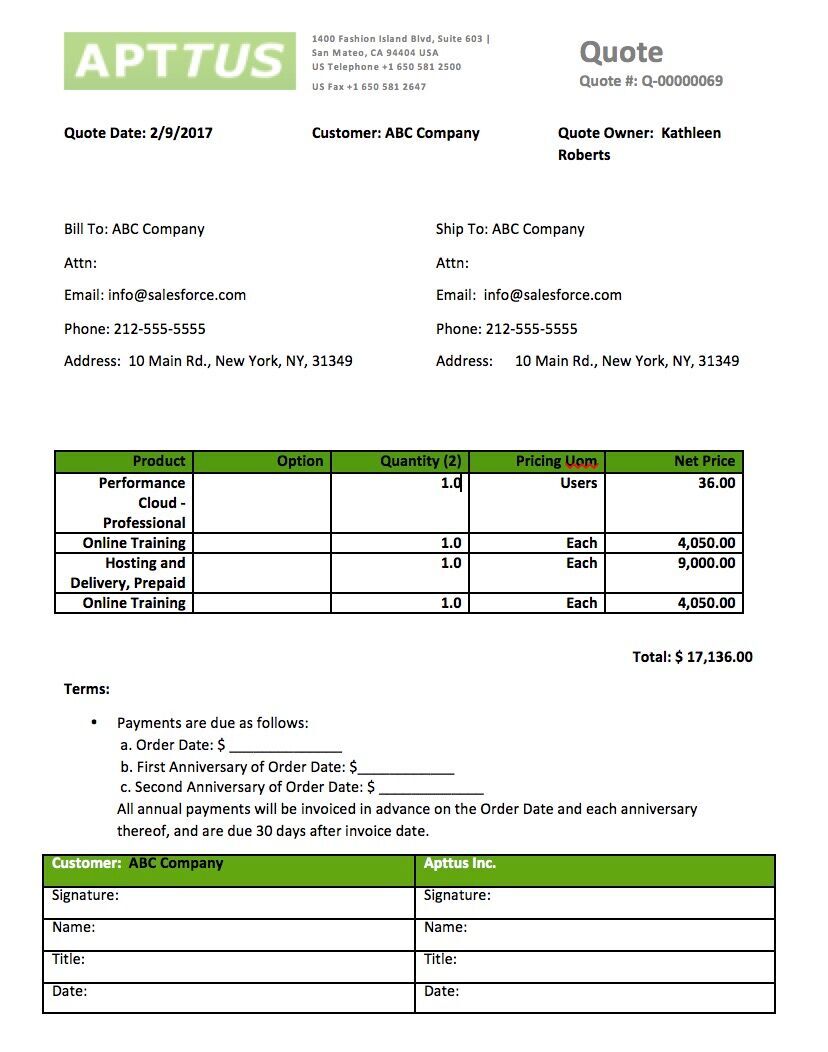
Once connected to the right instance, you can open the Word file for the Quote template and start inserting the appropriate fields. A typical quote template will look like this. Sections highlighted in blue are fields that we need to delete and insert the correct Apttus system fields. Please note that highlighting and over-writing will not give you the desired results. You will need to delete and insert the fields.

The next screenshot shows the window with Apttus fields available to be inserted into the quote template. While the task to insert single fields is quite straight forward, the task of creating a table with fields is a bit more tedious.

So for example if you want to create a table with 3 columns

  • Product
  • Option
  • Quantity

You will need to hold the Control Key down while selecting the 3 fields in the right order, then check the “Insert as a table” check mark and then complete the wizard.

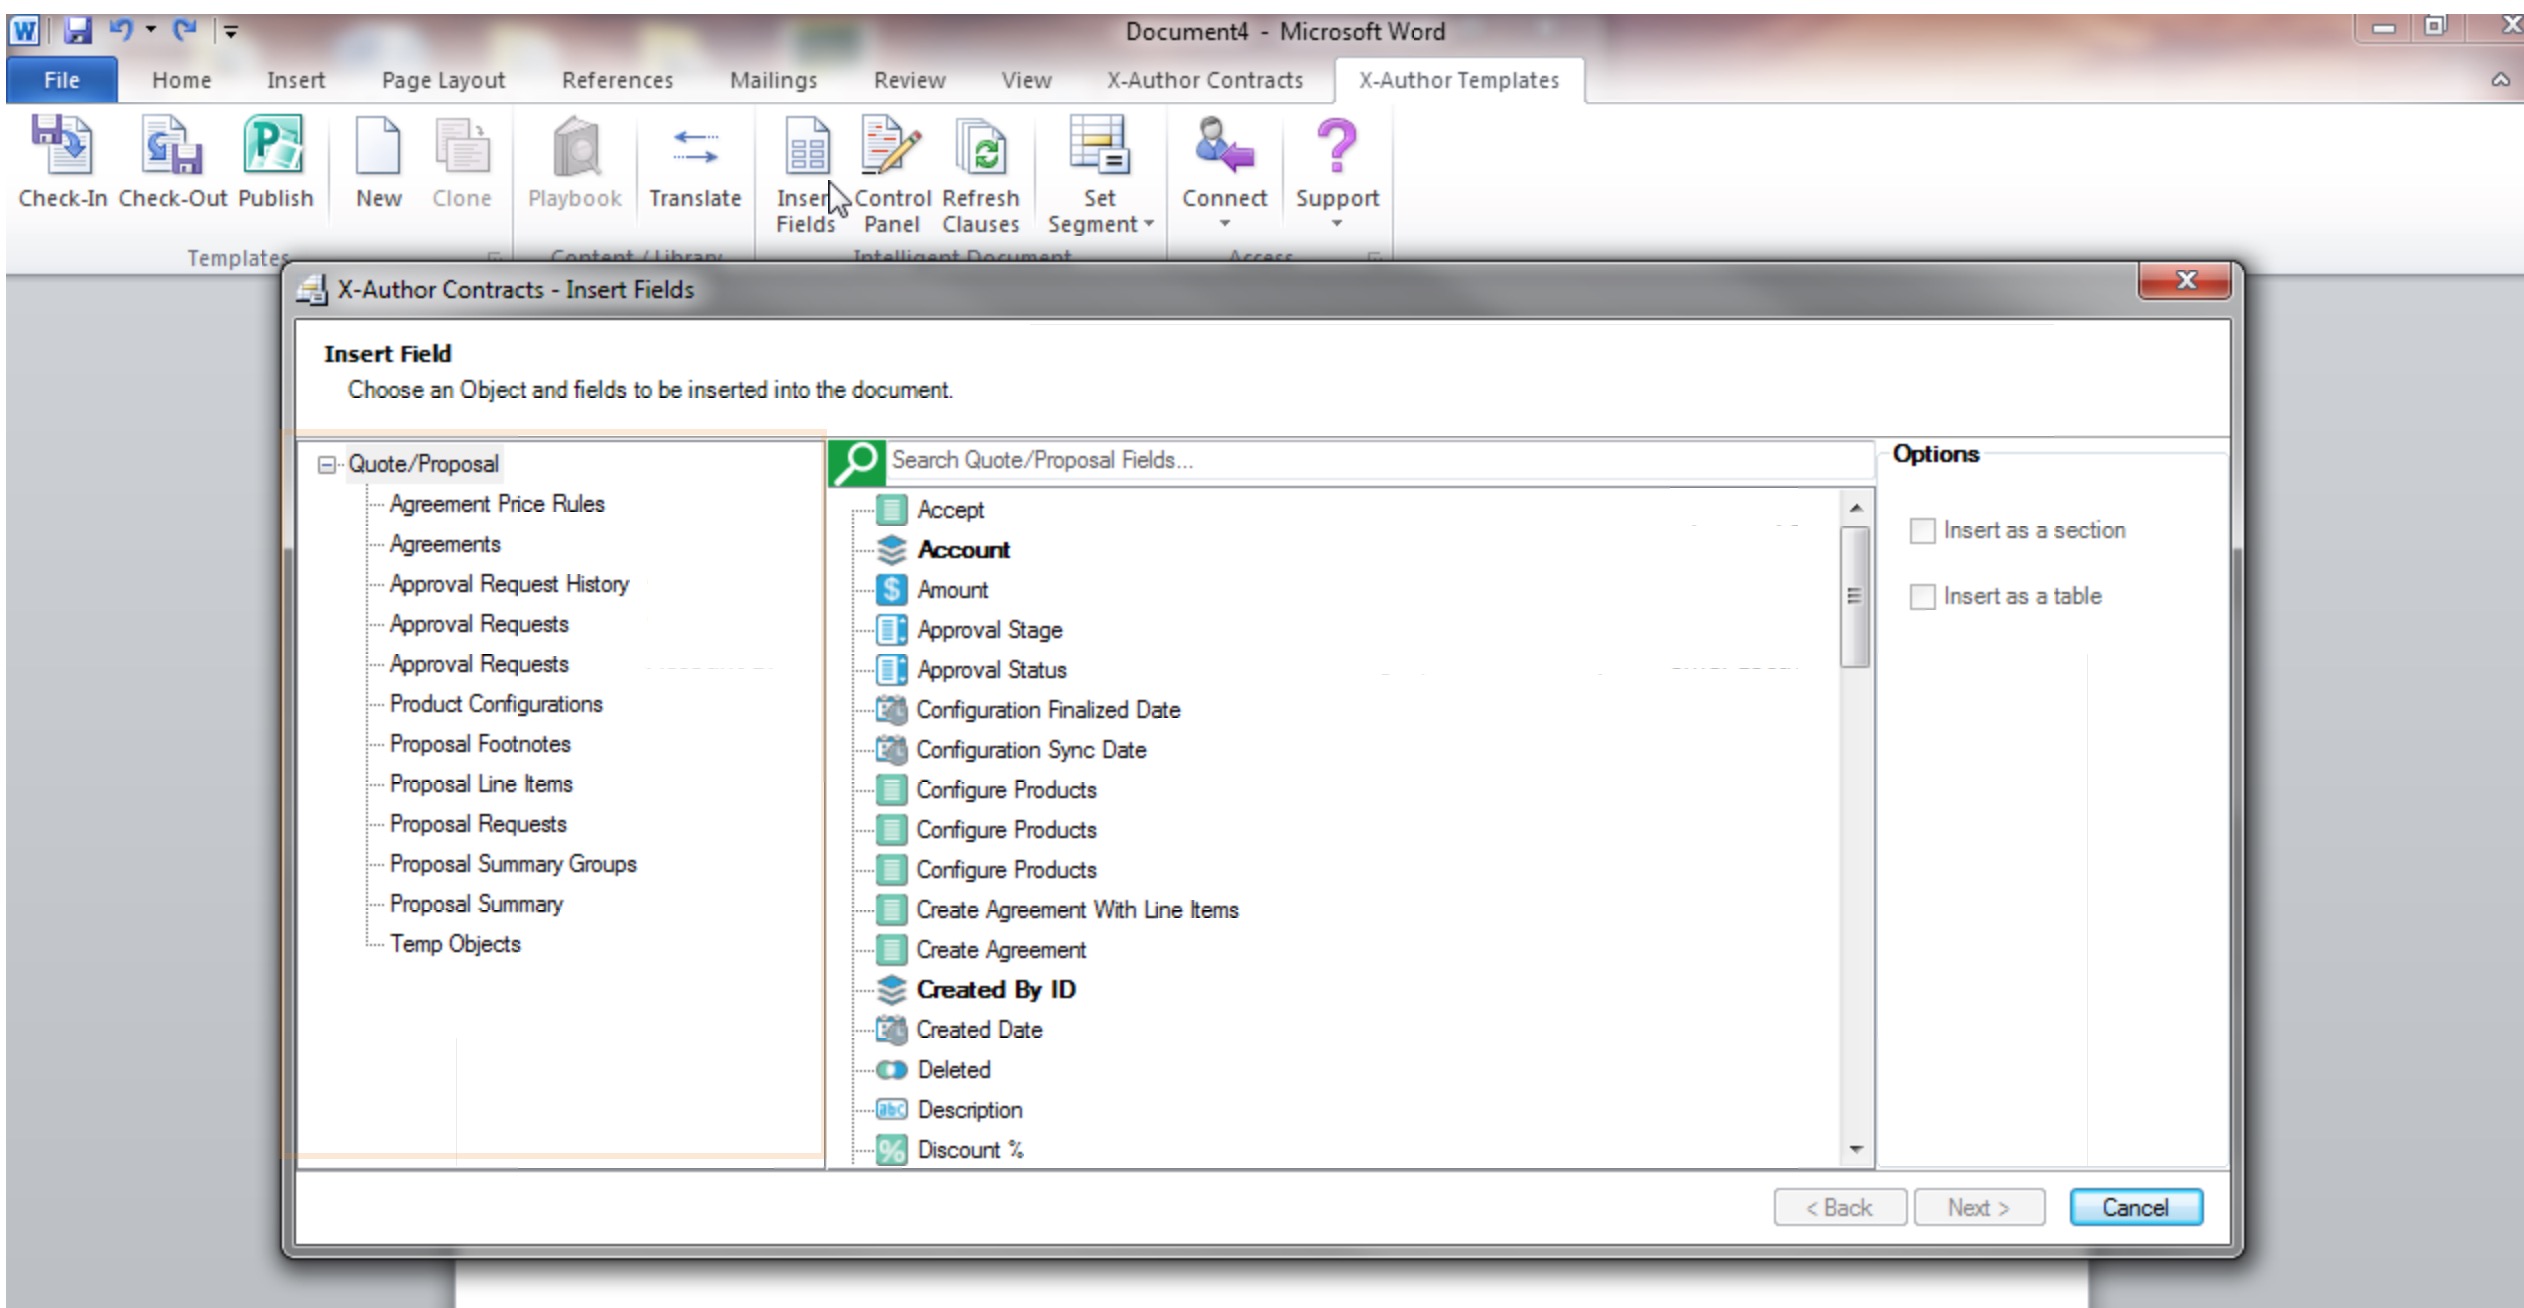
If you miss any of these steps, you will get a badly rendered quote.

Here is what your finished quote will look like. This can be generated as a *.doc, *.docx, *.rtf or *.pdf format.

Feel free to reach out to me on Linkedin if you have any questions about this.
https://www.linkedin.com/in/versashore

Creating an Account and an Opportunity in Salesforce CPQ/ Steelbrick

Here are the basic steps to setting up an account and an opportunity in SFDC CPQ

    1. Log into your salesforce instance
    2. Navigate to the Account tab
        1. Click New

    3. Enter Values

    1. Then click Save
    2. Click New Contact

    1. Enter the following values

    1. Create New Opportunity

    1. Set the following field values and click save

    1. Navigate to Opportunities and click new

    1. Click on New Quote

    1. Set the following field values and save

    1. Click on the pop-up to save the price book

    1. Click Add products and add any products you have already defined.

    1. If you do not have products, you can enter the following details for products

    1. Create a quote by adding the following quantities

    1. Save and review the quote lines related list

    1. Navigate to the opportunity and review the quote and products related list

  1. Create your first quote with the same quantities and prices as mentioned in step 15 and confirm if your grand total matches $ 3,617.50

Installing Steelbrick CPQ in Salesforce.com

Here are the basic steps to setting up SFDC CPQ


  1. Log into your salesforce instance
  2. Navigate to Price Books tab
    1. Deactivate Standard
    2. Activate Standard Price Book
  3. Install the Native CPQ package
    1. https://login.salesforce.com/packaging/installPackage.apexp?p0=04tA0000000SCaYIAW
  4. Click Install for all users
  5. Install package and approve third party access
  6. Once successfully installed, you will receive an email confirming successful install
  7. Navigate to setup| Installed packages and click configure
    1. Authorize Steelbrick for access
    2. Under Steelbrick settings, enable “Authorize new calculations in service”
  8. Setup the following Package Settings
    1. Document Folder Tab: Quotes and enable full page preview
    2. Line Editor Tab: Enable Visualize Product Hierarchy and enable multi-line delete
    3. Subscriptions and Renewals: Month
  9. Choose SteelBrick CPQ from the app menu to change to a more convenient layout


Now your Steelbrick CPQ is ready for use.

Key Features in OBIEE, Tableau and Salesforce Analytics

We recently completed our first Wave Analytics project for a leading financial institution in North America. Here is a tabular comparison of key features in OBIEE, Tableau and Salesforce Wave Analytics.


OBIEE Tableau Salesforce Wave Analytics
Report Analysis Sheet/Analysis Lens
Data Snapshot View View/Query Dataset
Dashboard Dashboard/Page Story/ Dashboard App/Dashboard
Guided Navigation Yes Limited Yes
Prompts Supported Supported Supported
Caching Yes Yes No
Parallelism No Yes Yes
Aggregate Aware Yes No n/a
Report Alerts Yes Yes Yes
Supported Data types Several Several CSV and JSON
Built in ETL tool None None None
Security Row Level Row Level Row Level
Parameters Yes Yes Yes
Variables Yes Yes Yes
Cloud Yes Yes Yes
On Premise Yes Yes No

PolyBase 101: Bridging your Data

Basically, PolyBase allow you to connect

  • structured and
  • un-structured data

aps

in a Microsoft Analytics Platform System (APS) appliance using T-SQL.

Project PolyBase was based on the research done by Technical Fellow David DeWitt at Gray System Lab. The primary goal was to find an easy, seamless way to integrated unstructured Big Data with relational, structured data residing in an RDBMS. PolyBase make it easy to blend all data types using the familiar syntax of T-SQL. Here is a simple example on how to create an external table with data sourced from a Hadoop cluster.

–Create a new external table in APS

CREATE EXTERNAL TABLE [ database_name . [ dbo ] . | dbo. ] table_name

( <column_definition> [ ,…n ] )

WITH ( LOCATION = ‘hdfs_folder_or_filepath’,

DATA_SOURCE = external_data_source_name,

FILE_FORMAT = external_file_format_name

[ , <reject_options> [ ,…n ] ]

) [;]

<reject_options> ::=

{

| REJECT_TYPE = value | percentage

| REJECT_VALUE = reject_value

| REJECT_SAMPLE_VALUE = reject_sample_value

}

The Hadoop region is not automatically installed on APS. It is an option and therefore needs to be configured appropriately in APS V2 AU1 and beyond.

Here is a list of pre-requisites before Hadoop can be used on APS:


  • Java runtime libraries need to be installed
  • Static PDW_User has to be created on Hadoop
  • Hadoop connectivity has to be enabled and configured for
    • HDInsight,
    • Hortonworks or
    • Cloudera

This is huge for SQL Server customers looking to integrate Big Data with their Relational Data.  By choosing APS/PolyBase, they can extend their existing in-house staff that is already familiar with T-SQL. Additionally the fully parallelized nature of PolyBase allows users to write heavy duty, industrial strength queries that can handle Petabytes of data without breaking down.

Stay tuned for more blogs on Microsoft APS.

Quick Guide: APS Software Architecture

The Microsoft APS Appliance consists of the following domains

  • Fabric Domain,
  • PDW Workload Domain &
  • HDI Workload Domain

appliance-domain

The Fabric Domain consists of


  • Physical Hosts
  • Virtual machines needed to maintain infrastructure and workload VM configurations


The PDW Workload Domain consists of


  • PDW Workload
    • SQL Server 2012 Enterprise Edition (PDW/APS build)
    • Control node and compute notes for PDW workload
  • Storage
    • More files per filegroup
    • Leverages multiple spindles in parallel


The HDI Workload Domain consists of


  • HDI Workload Details
  • Windows HDI (Hortonworks HDP)
  • Head/Security/Management nodes and Data nodes

Stay tuned for more information on Microsoft APS.

A Beginner’s Guide to Understanding APS Hardware Configurations

What is Microsoft APS?

The Microsoft APS Appliance is a Massively Parallel Processing (MPP) database appliance that is engineered

to support businesses challenges around

  • Data Growth,
  • Infrastructure Modernization &
  • Real-Time Analytics.

aps-hardware


The following three vendors manufacture Microsoft APS Hardware:

  • HP
  • Dell
  • Quanta

Typically APS is bought as a “RACK” or a fraction of a rack.


  • HP sells APS hardware in 1/4, 1/2, 3/4 and Full rack configurations; going up a size adds 15TB in disk space
  • Dell and Quanta sell APS Hardware in 1/3, 2/3 and Full rack configurations; going up a size adds 22TB in disk space

So if you were to buy HP hardware, this is how you would scale up:


HP APS Appliance

1 Base Unit

Add On

# Compute Nodes

2

4

#SQL Compute Nodes

2

4

# SQL Cores

32

64

SQL Computing Memory (GB)

512

1024

SQL Usable Capacity RAW (TB)

15

30

SQL Capacity Compressed (TB)* estimated

75

150

On the other hand, if you were to go down the path of buying Dell or Quanta hardware, this is how you would scale up:

Dell or Quanta APS Appliance

1 Base Unit

Add On

# Compute Nodes

3

6

#SQL Compute Nodes

3

6

# SQL Cores

48

96

SQL Computing Memory (GB)

768

1536

SQL Usable Capacity RAW (TB)

23

46

SQL Capacity Compressed (TB)* estimated

113

226

Stay tuned for more information on Microsoft APS.

What can Large Data (Big Data) Do for You?

Over the last 40 years, companies have spent a better part of their data budget on building data marts and analyzing structured data.  While this was primarily done because the companies had easier access to data, technologies and talent necessary to get the job done.

Fast forward to 2013, where the millennials are generating several hundred petabytes of unstructured data with Instagram, Facebook, Twitter and its brethren.

By some estimates the flood of social media generated unstructured data constitutes approximately 80% of all data generated today and continues to be labeled as Big Data. The term “Big” Data has been genericized, over-used, mis-used and hyped so much that, Big Data is a term used to describe just about any type of data.

So what is Big Data?

Big Data is data whose scale, diversity, and complexity require new
architecture, techniques, algorithms, and analytics to manage it and extract value and hidden knowledge from it.

Big Data is a data set so large it cannot be managed in conventional database management systems with acceptable performance and at acceptable cost.

Here is a more pragmatic view of Big Data as I see it: several business
scenarios that fall under the general classification of large data sets, large (and complex) analysis, large (and concurrent number of users) and the
proliferation of anywhere, anytime, available Cloud infrastructure.

I prefer to call it Large Data.

As one of the most pervasive buzzwords of this era, “Big Data” gets mentioned in every possible connotation and permutation while describing its 3 major characteristics

  • Volume
  • Variety
  • Velocity

A vast variety of users and practitioners forget the other “V”- Value. Value of data and its ability to drive meaningful business analysis is paramount to business users. Yet, most practitioners insist on focusing on volume, variety and velocity. While the latter three have their pros, one cannot under
estimate the undeniability and omni-presence of Value.

Armed with the right use case, mining the large data set with the appropriate set of business questions will usually yield compelling and relevant insights for your business. These insights then lead to actionable intelligence and informed, fact based decision making. For example, one of the largest oil companies is analyzing their accounts payable information (structured data) in conjunction with social data (IM chat, SMS, emails, etc) to identify duplicate payments made to vendors. The resulting ROI from this exercise goes straight to the bottom line!

In conclusion, executives should be asking questions along the lines of:

  • What are the best use cases for us to drive meaningful value from the large data we have access to?
  • What value can we extract from our data to increase profits/revenue or decrease costs?
  • What can we learn about customer behavior and up-sell them on additional product/services?
  • Who are our most profitable customers and what else to they want?
  • Who are our least profitable customers and what additional value can we provide them?

OBIA Upgrade from 7.9.6.x to 7.9.6.3

We recently performed an upgrade of the Oracle Business Intelligence Applications (OBIA) version to v7.9.6.3. These are the steps we went through
Steps for upgrading OBIEE 10g to 11g on Windows 2008 R2 server
Upgrading BI repository and catalog
1) Login into system where the OBIEE 10g RPD and Webcatalog are installed.
2) Take a backup of the existing RPD and Webcatalog
3) Copy the files to the machine where OBIEE and/or OBIA 11g is installed.
In order to upgrade the repository and presentation catalog, go through the following steps using the Upgrade Assistant.
4) Please note that the WebLogic Administration Server and the Managed Server in the 11g environment must remain running during the upgrade process.

5) Navigate to the ORACLE_HOME\bin directory of the Oracle Fusion Middleware installation. In this example, the directory path is D:\bi\Oracle_BI1\bin.


obia-uprade-1


obia-uprade-2

6) Double-click ua.bat to open Upgrade Assistant in the graphical user interface mode. This tutorial describes how to use Upgrade Assistant in the graphical user interface mode. You can also use the Upgrade Assistant command line to perform these tasks.

obia-uprade-3
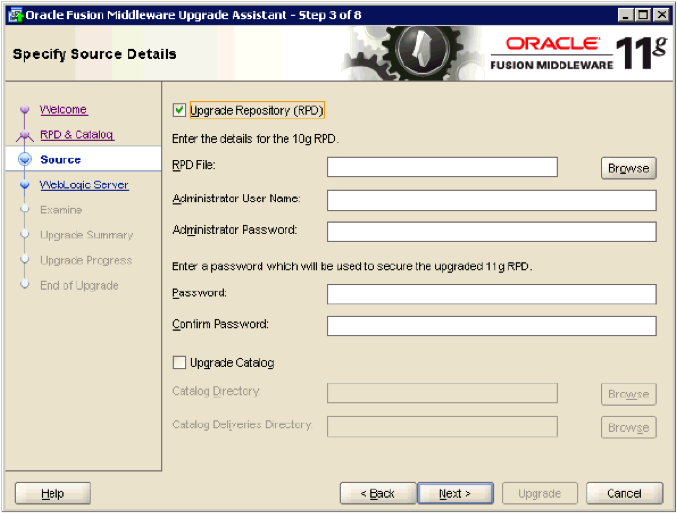
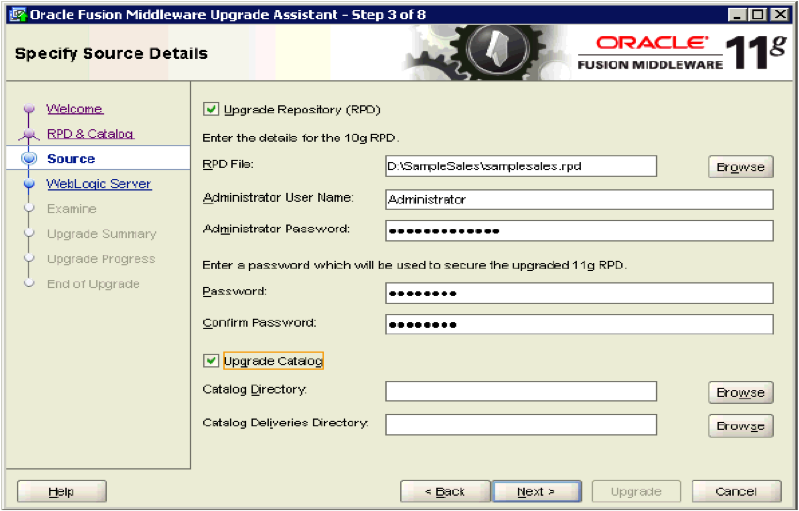
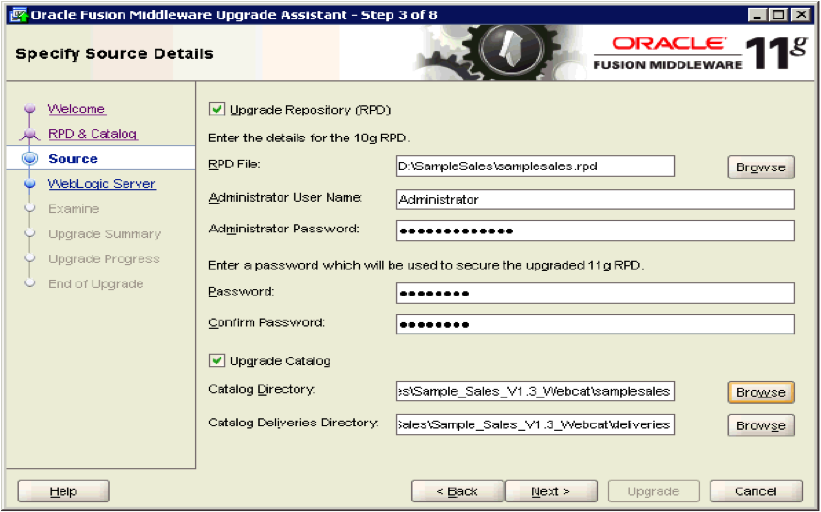
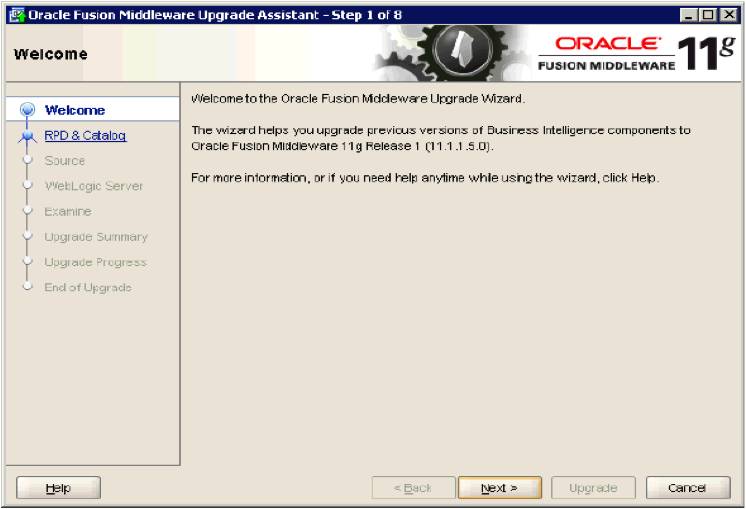
7) Click on Next button

obia-uprade-4
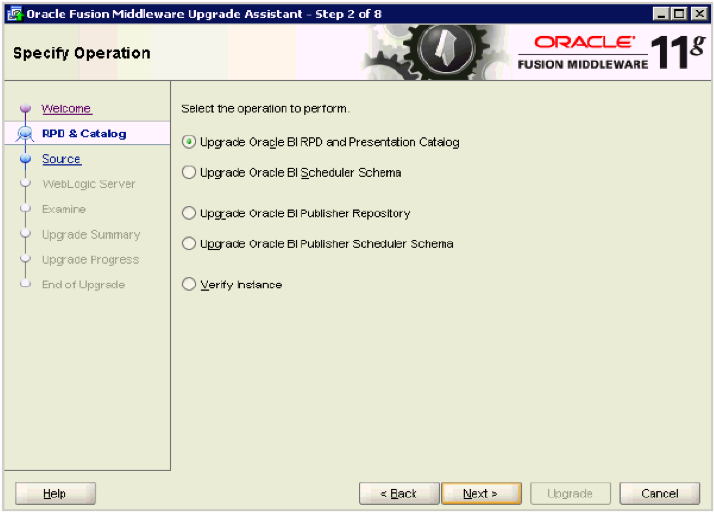
8) On the “Specify Operation” screen, select Upgrade Oracle BI RPD and Presentation Catalog and click Next

obia-uprade-5

9) On the “Specify Source Details” screen, select Upgrade Repository (RPD). Click Browse next to the RPD File field.

obia-uprade-6

10) Browse to the location of the 10g version of the repository and click Open.

obia-uprade-7

11) The path to samplesales.rpd is added to the RPD File field.obia-uprade-8

12) Enter the Administrator User Name and Administrator Password for the 10g samplesales repository.

obia-uprade-9

13) Select Upgrade Catalog. Click Browse next to the Catalog Directory field.

obia-uprade-10

14) Browse to the location of the 10g version of the Sample Sales presentation catalog and click Open.

obia-uprade-11

15) The path to the Sample Sales presentation catalog is added to the Catalog Directory field. The path to the deliveries directory is automatically added to the Catalog Deliveries Directory field.
Click Next to continue.

obia-uprade-12

16) On the “Specify WebLogic Server” screen, enter the WebLogic Admin Server port number. Typically the port number is 7001.

17) Enter the username and password for the WebLogic Admin Server. Click Next to continue obia-uprade-13

18) On the “Examining Components” screen, wait until you see a succeeded message. During the examination process, Upgrade Assistant checks whether the source directory exists, the source directory is readable, and contains a file for upgrade.
Click Next to continue.

obia-uprade-14

19) On the “Upgrade Summary” screen, review the summary of the upgrade to be performed.
Click Upgrade to start the upgrade process.

obia-uprade-15

20) On the “Upgrading Components” screen, you can view the upgrade progress. BI components are stopped and restarted. The Sample Sales presentation catalog and repository are loaded.

obia-uprade-16

21) When the upgrade completes the status changes to succeeded. If there are errors during the upgrade, inspect the log files for details. The log files are located in
\upgrade\logs\ua.log where is the current date and time. You can also check the component log files in directories organized by component under \diagnostics\logs.
Click Next to continue.

obia-uprade-17

22) On the “Upgrade Success” screen, review information related to the upgrade task and click Close.

23) Verifying the upgrade process
The Upgrade Assistant automatically loads the new repository to the 11g BI Server and restarts all BI components. You can verify that Oracle BI EE has been upgraded successfully by logging into the 11g system to confirm that Oracle BI EE components are running, checking repository metadata, and verifying that you are able to view dashboards and reports. To verify the upgrade, perform the following steps.

24) In a browser, enter https://localhost:7001/em to log into Fusion Middleware Control on the 11g system.

obia-uprade-18

obia-uprade-19

25) In the left pane, expand Business Intelligence > coreapplication. In the right pane, select the Overview page and confirm that all system components are available. Select the Deployment page.

obia-uprade-20

26) Select the Repository subtab. This page shows the current installed repository. Notice that the Upgrade Assistance automatically uploaded the upgraded repository to the BI Server domain. In this example, the repository is named as samplesales_BI0002.

Verifying Metadata

27) Select Start > Programs > Oracle Business Intelligence > BI Administration to open the Administration Tool.

obia-uprade-21

28) Select File > Open > Online to open the repository in online mode.

29) Enter the repository password and user password. The repository password is the password that you identified earlier during the upgrade process: welcome1. The username and password are the Oracle WebLogic Server administration username and password created during your 11g installation. In this example, the user is weblogic.

obia-uprade-22

30) Verifying Reports and Dashboards:

obia-uprade-23

31) In a browser, enter https://localhost:7001/analytics/saw.dll?bieehome to log into OBIEE 11g
Note: localhost=BI Server Name

32) Sign in to Oracle BI 11g as an administrative user. In this example the user is weblogic. Your username and password will vary depending on how you have installed and configured your environment

obia-uprade-24

obia-uprade-25


© 2019. Versa Shore Inc., All Rights Reserved.